|
I'm no expert, but I have cleaned out a lot of flint tubes. I have never been able to get good tips on doing this nor find any information on it. One person who sold me a lighter that I was trying to get the flint out of when I first started said to just put a drop of water on it and wait for it to dissolve the flint. I guess he thought it was funny that I would be dumb enough to do that - which I was. Of course, it didn't work... for 2 days it didn't work. My point here is that I haven't found any easy way to do this and there doesn't seem to be any other information out there about it.
If I get any tips that make this job easier, I will amend this article with them.
Introduction
 Lighters weren't made with the thought in mind that people would leave them laying around for years while the flints decomposed and became stuck in the tubes. So, to clean them out, you will have to make your own primary tools and work with what you have on a case-by-case basis. Lighters weren't made with the thought in mind that people would leave them laying around for years while the flints decomposed and became stuck in the tubes. So, to clean them out, you will have to make your own primary tools and work with what you have on a case-by-case basis.
Flints were originally known as Auermetal after the inventor; 'metal' being the operative part of the word. Flints are made of a metallic rare earth component, Cerium, and Iron Oxide (modern flints also use some Magnesium Oxide); flints are synthetic metal alloys. So when you run into a lighter with an old decomposing flint in it, you are about to remove some dust from the decomposition (the easy part) and some metal that hasn't decomposed (the hard part).
As a side note, if you are a smoker and periodically dump the flint dust into a nearby ashtray, the cerium part of that dust will flare up a little bit and spark when you flick hot ashes into it; your own occasional miniscule fireworks!
Recommended Tools
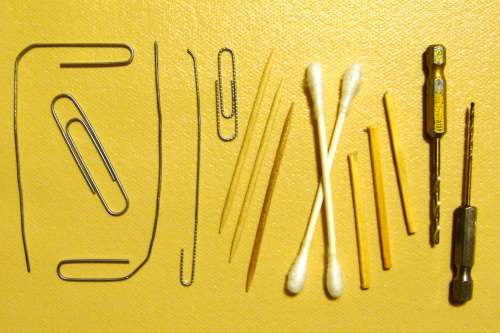
 Pictured is my tool set for cleaning out flints. Pictured is my tool set for cleaning out flints.
- Paper clips - large - You'll need several. Typically 2 will be in use at a time, but they do "wear out" by getting bent and straightened, causing the wire to fail and break.
- Paper clips - standard - These aren't very strong and not frequently used. But note the small bend at the end of the straightened paperclip: this little bend is a scraper that, when done just enough, will be forced against the side of the tube for scraping purposes. I prefer the paperclips with the little grooves cut in them to better hold papers; these "grooves" also serve to help scrape away any residue as the run against the sides of the flint tube.
- Drill bits - 1/16" and 3/32". Not pictured, but, obviously, you will need a drill, too! Get the longest and best quality bits you can find. When you use these you will be drilling metal out - not wood! I use a small Black & Decker battery powered screwdriver for these; if you have too fast or powerful a drill, you may drill faster or deeper than you intend and destroy the flint tube.
- Match sticks & toothpicks - Cut the heads off the matches. While you're working on the lighter, you may as well clean it up a bit. These are great for getting the grime off that typically surrounds the wick and flint wheel area. The wood is hard enough to remove the residue build up without damaging the finish. Use with a couple of drops of lighter fluid as a solvent.
- Q-Tips - Also used for a little clean up around the wick and spark wheel area. After scraping with match sticks and toothpicks, "mop up" with a Q-Tip.
Where To Start
First, you must find the flint tube. There should be a retaining screw to hold everything in place, a spring to exert pressure on the flint to keep it in contact with the spark wheel, and then the spark wheel itself.
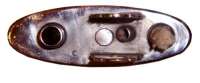
On a lift arm lighter this is typically a tube on the top part of the lighter and parallel with the top. On aluminum block lighters, the tube is drilled through the block and goes straight through to the flint wheel. There is a set screw on one end, a spring in the drilled tube, and the spark wheel at the other end.
On automatic lighters the tube opening is typically on the bottom of the lighter - usually next to an opening for fuel filling.
What Kind of Flint Tube is Used
Next, you must determine what sort of flint tube you are working with. There are two kinds: straight or curved. Straight is pretty simple and easy; curved presents some challenges. Many lighters have simple straight-through flint tubes and are easy to clean out. Many others have have a curved tube and that isn't so simple.
Lift Arm Lighters and Aluminum Block Lighters typically have simple straight tubes. Every Zippo-style lighter I have seen has a straight tube.
Older Ronson lighters (e.g. to mid-1950s) typically have curved tubes as do most of the Japanese and other lighters that are Ronson look-alikes. Newer model Ronsons will typically have a straight flint tube. Ronsons are, by no means, the only older lighters to have curved flint tubes; many brands, such as Evans, also have curves in the flint tube.
Is the tube clear?
To check: Use a large paper clip to push into the tube in an attempt to get the end of the paper clip against the striking wheel.
If the tube is clear and the paper clip is against the wheel, this will stop the wheel - so attempting to operate the lighter will be pretty much defeated at this moment; retracting the paper clip slightly then should allow operation. If this happens, the tube is pretty well cleared all the way through to the striking wheel.
Drop a flint through to check. It may be necessary to use the small paper clip with the little bend at the end to scrape the inside of the tube to remove remaining residue.
The small paper clip is used because it is more flexible and will reach curves that the large paper clip will scoot by because it isn't flexible enough to hit every spot in the tube.
|
Cleaning Lift Arm and Aluminum Block Lighters
Remove the retaining screw and spring. Most models will also have a screw going through the center of the spark wheel. Remove that screw and the spark wheel to make the whole task simpler.
Use a large paper clip to ram through the tube and maybe you will be lucky and all of the dust and debris will just fall out and the tube will be clear. If not, just use the paper clip to keep poking and scraping the tube and maybe the residue is broken down enough to all come out.
If the tube still isn't clear, use the 3/32 drill to go through the tube and clean it out. Unless you have a particularly tough flint in there, this should do it. If the flint is really tough, you may want to use the 1/16 drill to make a pilot hole through it. The pilot hole will often cause the remaining part of the flint to break up and fall out. In any case, use the 3/32 drill again to make sure the tube is cleared to it's full diameter.
Check to see if the tube is clear (see sidebar). If not, you have more clearing to do.
Now, if you're doing a lift arm lighter, you may want to get the match stick and toothpick and clean up the top a bit. A little lighter fluid will help; put a drop of two on the top to help break up the residue as you scrape with your match stick and toothpick. A Q-Tip can serve to clean up the remains and add a little buff to your cleaning work. Yes, it is too big... just push it and twirl it around and it will get into most of the tight spots.
Cleaning Automatic Lighters
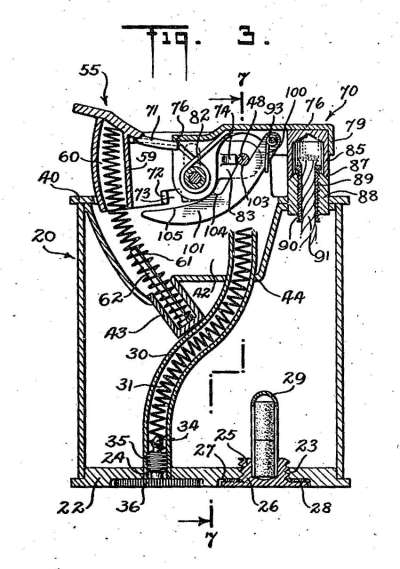
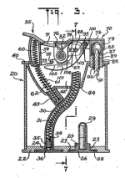 Some automatic lighters have straight flint tubes and are generally pretty easy to clean - very much like the lift arm and aluminum block lighters. But, many have curved tubes and if a drill is used on them, it will easily puncture the tube and render the lighter useless; if the drilling is vigorous enough, the drill will come out the top of the case and well away from the spark wheel. A part of the patent drawing for an Evans Trig-A-Lite shows the curved flint tube in it. Some automatic lighters have straight flint tubes and are generally pretty easy to clean - very much like the lift arm and aluminum block lighters. But, many have curved tubes and if a drill is used on them, it will easily puncture the tube and render the lighter useless; if the drilling is vigorous enough, the drill will come out the top of the case and well away from the spark wheel. A part of the patent drawing for an Evans Trig-A-Lite shows the curved flint tube in it.
There will be a curved flint tube in a Ronson Gem, Pet, Princess, Standard, Vee, Whirlwind, and others as well as most other brands (or non-branded) that are "flats" and closely resemble Ronsons. If you're not sure, it's not too difficult to check.
In any case, begin with the large paper clip and get everything loose out of the flint tube. Check to see if you got lucky and the tube is clear (see sidebar) to the spark wheel.
To check if the tube is straight or curved, use a drill bit. Hold it in your hand and gently push it as far in the tube as it will go. If the tube is straight, you should be able to easily spin the drill bit - because it is just butting against the obstruction, but not forcefully enough to stop you from spinning it in your fingertips. If you meet resistance in spinning it, the drill is probably in a curve and one side of the curve is resisting an edge on the tip of the bit. NOTE: If the obstruction runs far enough down, the drill may spin freely because of the obstruction and the tube still may be curved above it! Check how deep your drill is in the hole and compare that with the length from the hole to the spark wheel - this should let you know if you're about there, or not.
If you're reached a curve, forget the drill. You're probably all finished from this end and need to take the lighter apart and clear the tube from the top under the spark wheel. The other alternative is discussed below at Cleaning Other Types.
To clean from the top, the spark wheel and its surrounding mechanisms must be removed. These are often easier removed than replaced! See the section below on Removing / Replacing The Spark Wheel.
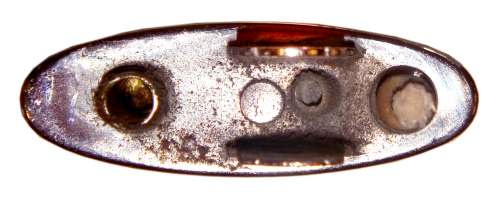
Once the flint wheel is removed, you will see the clog present at the top of the lighter, as illustrated in the "Before Cleaning" photo. Use the 1/16 drill bit to punch a little hole through it. Care must be exercised here as you want only to go through the clog - not the curve in the flint tube somewhere below it! The good news is that is is less damaging to the flint tube if you hit it a bit from the top. This is because the flint is coming through from the bottom and will just slide past some damage; if damaged from the bottom, the damage will catch the flint and stop it. Of course, damaging the flint tube enough to put a hole in it will also mean that lighter fluid will leak into it and that is not a good thing.
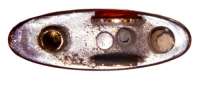 |
| Before Cleaning |
 |
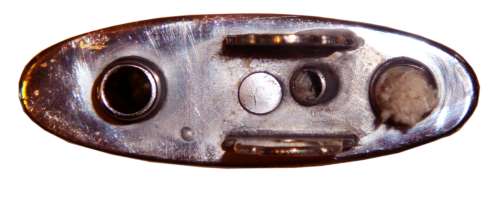
| After Cleaning |
Once you've punched through the clog with the 1/16 drill, clean it out with the 3/16 bit and you should have a good clean tube ready for flint. Drop a flint in the bottom and see if it falls right through the tube. If not, it's time to get the small paper clip with the little bend on the end and start scraping and rotating it in the flint tube to remove residue that is preventing the flint from easily sliding through.
As long as you have the top off, may as well clean it up a bit. A couple of minutes of work with a match stick, toothpick, and a couple drops of lighter fluid will probably make a change for you as in the two "Before" and "After" pictures!
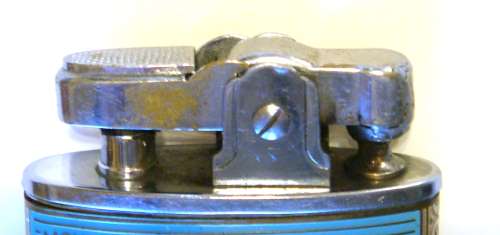
Removing / Replacing the Spark Wheel
There are many, many types of lighters and a book could be written on removing the spark wheels from all of them. This is meant to be brief, so I will deal with one of the simplest mechanisms. A little practice will give you the feel and confidence to work on most of them!
First, be sure the flint retaining screw and spring are removed.
 This is a Ronson style (not Ronson) lighter. There is a shaft that goes through a hole and holds everything in place. Typically, these are pretty easily removed - a small screw on one side goes into the threads of the shaft which comes through from the other side and on which the snuffer cap and spark wheel rotate. Remove the screw. Use the paper clip to push the shaft out while having a finger gently supporting the snuffer cap and the depressing lever. Preferably the lighter is upside down when you do this so everything stays pretty much in place. You must take care to note the positioning of all of the parts! That is very helpful when time comes to put it all back together. This is a Ronson style (not Ronson) lighter. There is a shaft that goes through a hole and holds everything in place. Typically, these are pretty easily removed - a small screw on one side goes into the threads of the shaft which comes through from the other side and on which the snuffer cap and spark wheel rotate. Remove the screw. Use the paper clip to push the shaft out while having a finger gently supporting the snuffer cap and the depressing lever. Preferably the lighter is upside down when you do this so everything stays pretty much in place. You must take care to note the positioning of all of the parts! That is very helpful when time comes to put it all back together.
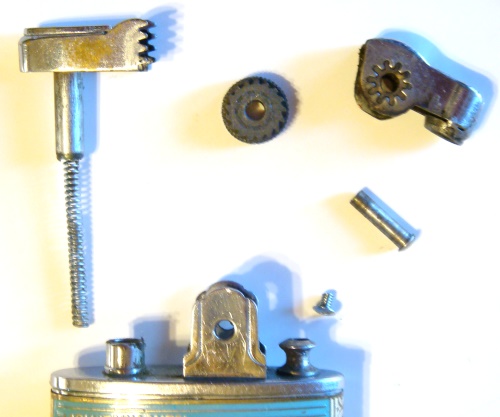
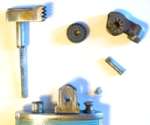 Once the lighter is apart, you will have a selection of parts resembling those pictured. Take special note of the spark wheel. Notice the little cogs or gears on one side. The spark wheel must move with the snuffer cap when it lifts up in order to produce a spark. A clutch is used to cause the spark wheel to function. The spark wheel is locked into place for the upward movement so it will grate against the flint causing a spark. In order to do this, the cogs of the wheel must be in the proper Once the lighter is apart, you will have a selection of parts resembling those pictured. Take special note of the spark wheel. Notice the little cogs or gears on one side. The spark wheel must move with the snuffer cap when it lifts up in order to produce a spark. A clutch is used to cause the spark wheel to function. The spark wheel is locked into place for the upward movement so it will grate against the flint causing a spark. In order to do this, the cogs of the wheel must be in the proper 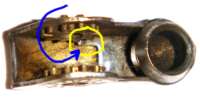 position relative to the clutch. Note in the detail photo of the underside of the snuffer cap the clutch for this particular model is circled with an arrow pointing to it. The cogs must be on the same side as the clutch for the lighter to function. Some lighters have a little piece of spring steel beside the wheel with a flat side to it; this causes the clutch to grasp and move the spark wheel when the snuffer cap moves. NOTE: The gears you see in the pictures on the snuffer cap are common to most lighters of this style and, in the picture, are actually pushed in a bit. These typically fit into holes in the sides of the snuffer cap and work with the push lever to make the cap open up. When the spark wheel is in the cap, these will be to the outside. When the lever and cap are properly aligned the cap should open up at about a 90 degree angle; until you get the feel for it, you may have to remove the shaft and reposition the push level relative to the snuffer cap until you figure out just where they should both be when putting the lighter together. position relative to the clutch. Note in the detail photo of the underside of the snuffer cap the clutch for this particular model is circled with an arrow pointing to it. The cogs must be on the same side as the clutch for the lighter to function. Some lighters have a little piece of spring steel beside the wheel with a flat side to it; this causes the clutch to grasp and move the spark wheel when the snuffer cap moves. NOTE: The gears you see in the pictures on the snuffer cap are common to most lighters of this style and, in the picture, are actually pushed in a bit. These typically fit into holes in the sides of the snuffer cap and work with the push lever to make the cap open up. When the spark wheel is in the cap, these will be to the outside. When the lever and cap are properly aligned the cap should open up at about a 90 degree angle; until you get the feel for it, you may have to remove the shaft and reposition the push level relative to the snuffer cap until you figure out just where they should both be when putting the lighter together.
After the flint tube has been cleared, the lighter re-assembled, and flint put in the lighter it should spark. If it doesn't you very likely got the spark wheel in backwards. Not infrequently I have received lighters with a clear flint tube that still didn't work. Someone else had "fixed" them and put the wheel in improperly so no spark was caused; the wheel had to be removed and replaced. Once you've done this a few times the proper function will be apparent and you can make almost any lighter work!
Cleaning Other Lighter Types
Zippo style lighters have straight tubes and are generally pretty easy to clean. However, the spark wheel cannot be removed - so they have to be cleaned from one direction only. Not a problem if the tube is shorter than you drill bit... but sometimes, it isn't.
There are other lighters which may have either straight or curved flint tubes and the tube is too long to clean with a drill from one end. Of course, this isn't a big problem if the spark wheel can be removed... but sometimes it can't. Or, sometimes the mechanism on the top is one that you can see you really don't want to try taking apart because you may not be able to get it back together!
Well, there is no good news to be had here. The tubes can invariably be cleaned out - but it won't come easy. Now it's time to take two of the heavy paper clips and use some wire cutters and make a diagonal cut at the end so you have a sharp point on each one. Put both of them in the flint tube, push them to the obstruction. Now, using a firm grip or a pair of pliers you just alternate between twisting the pair of them around and around so the points gradually cut through the old flint and punching them into the flint - withdraw the pair a bit and them forcefully punch them back in hoping the impact will gradually break things loose. This is nothing more than a very tedious job - but it will work if you have enough persistence.
|